May 30, 2013
Save All in Microsoft Word 2010
May 29, 2013
Learning Word 2010 with: Chris Grover- Lynda.com
Learn how to leverage the power of Microsoft Word and create
strong, standout documents. First take a tour of the interface, where author
Chris Grover shows you where to locate the Word editing features and get information
about your documents. Chris then shows you how to set up a document to your
exact specifications, with the correct page orientation, size, spacing, and
breaks. He also shows how to format text and add interest with photos,
SmartArt, tables, and charts. Plus, learn how to collaborate with others using
Track Changes and share documents via print and email.
May 28, 2013
Freeze Panes in Excel 2010
Many times when working with a large spread sheet you need
to be able to view column headings at any point in your document. You can do this by freezing the panes. First
go to the View tab, and in the Window group you will click Freeze Panes. From here you can Freeze you panes based on
the cells you have highlighted, the first row, or first column. To unfreeze your panes simply follow these
same steps, except when you click Freeze panes this time you will see an
Unfreeze Panes option.
May 27, 2013
May 23, 2013
Same Formatting Across Spreadsheets in Excel 2010
Do you ever need the same heading information and/ or
formatting in multiple sheets? Instead of inserting the information multiple
times into each spread sheets here is how you can enter it only once. Simply
hold down the CTRL and click on each Sheet tabs that you would like to group.
Typically, the tab for the sheet you are in is white while the others are grey,
but now all the sheets that you have grouped will be white. Once you have entered the information and
completed the formatting you would like to appear on all your sheets, remember
to go back and select an individual Sheet tab to ungroup the sheets.
May 22, 2013
Excel 2013: Pivot Tables in Depth with: Curt Frye- Lynda.com
Join Curt Frye as he explains how to leverage PivotTables to
summarize, sort, count, and chart your data in Microsoft Excel. Curt shows you
how to navigate the complexity of PivotTables while taking advantage of their
power. This course shows how to build PivotTables from single or multiple data
sources, add calculated fields, filter your results, and format your layout to
make it more readable. Plus, learn how to enhance PivotTable with macros, DAX
expressions, and the PowerPivot add-in for analyzing millions of rows of data.

May 21, 2013
Document Map in Microsoft Word 2010
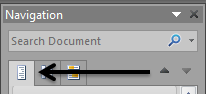
The Document Map can be an easy way to navigate through any
large document you may be viewing or editing.
The Document Map will essentially show you an outline of your
document. To use it click on the View
tab and in the group labeled Show, click the check box next to Navigation
Pane. Once your navigation pane is open
there are 3 little icon tabs without labels (see picture), if you click the
first icon the document map will be visible.
You can also use the shortcut ALT-V-D
to view the Document Map, but unfortunately this short cut does not work
in Word 2007.
May 20, 2013
"Harmonic Voltage" - Animusic.com
From the Animusic 1 DVD, this piece is an amazing combination of lasers, sound and rhythm.
http://www.youtube.com/watch?v=rGCTLJDoMGw&list=PLAE7974A68AC62B47&index=3
http://www.youtube.com/watch?v=rGCTLJDoMGw&list=PLAE7974A68AC62B47&index=3
May 16, 2013
Using Auto Save in Microsoft Office 2010
When you are working on a document it is
sometimes hard to always remember the very important rule to Save Often. Many of us are familiar with the Auto Save
feature in Microsoft Office, but you can also change how often your document
Auto Saves. In the File tab Click
Options, and then Click Save. In the pop up window make sure you have selected the
option for your documents to Save Auto Recover Information. On that same option you can select how often
you would like Microsoft to Save your documents. Remember you will need to change this option
in each Office Program. But once you have changed this option you will be
saving your documents more frequently and have a smaller chance of losing your
valuable information.
May 15, 2013
Architecture
If you love architecture, check out this web site – architizer.com It is an online portfolio for architects and a connection spot for architects, clients, journalists and everyone interested in architecture.
May 14, 2013
Custom Lists in Microsoft Excel 2010
In excel we use lists all the time, and it is nice that you
can auto fill your list when you are using a common one such as Jan, Feb, Mar
ect. But there are other lists that your
company may frequently use in Excel as well.
Instead of retyping that list every time you use it here is a way you
can set it up so Excel will auto fill that information, like it does with other
common lists. First Click on the File tab, then Click Options, in the new pop
up window Click on Advanced. Then in the same window scroll down almost all the
way to the bottom of the page and you will see a button that says Edit Custom
Lists. Once you click on it will show all the lists that will auto fill in
Excel. Lastly Click New List and add
your list of custom words.
May 13, 2013
"Resonant Chamber" - Animusic.com
From the Animusic 2 DVD - This is another amazing piece of incredibly beautiful and precise work from Animusic
http://www.youtube.com/playlist?list=PLAE7974A68AC62B47
http://www.youtube.com/playlist?list=PLAE7974A68AC62B47
May 9, 2013
Broadcast your Power Point Presentation in Power Point 2010
Many times when in a crowded room it can be difficult to see
a presenter’s presentation on the screen.
Well, as a presenter, here is a way to make sure everyone has a front
row seat. Once you have completed and saved your presentation, click on the
File tab, then click Save and Send, and lastly click Broadcast Slide Show. Then
you will see another button also labeled Broadcast Slide Show, once you have
clicked this button, backstage will close and a pop up window will open. In this window, click Start Broadcast, and the
next thing you will see is the option to email a link to your presentation, or
you can copy and paste the link into an email you have ready to send out to your
attendees. To close your pop up window, click Start Slide Show. Once your
attendees have clicked on the link you have sent, their device will become
their own personal screen where they can view your presentation.
May 8, 2013
Changing Logos
This is a short,
interesting article about changing logos. Every logo needs to be updated
occasionally to stay current with new advertising styles, new design styles,
etc. But you will see that the changes are subtle. The exception is the Ford
logo. But it happens to be the oldest of the six so it has been through the
most revisions.


I last changed the
Your Computer Lady logo in 2012.
· To show new technology – Replaced the big, fat
monitor with a thin version. Added a tablet.
· Made the company tagline stronger.
· Removed the “eyeball” in the center of her
head which had bothered some people!
We had removed the
print on her dress two or three years before. It was bridges to reflect our old
tagline “Your Bridge to Productivity.” When we changed taglines, the logo
had to change to match.
But we kept the grey
hair, braid and colored cat-eye glasses because I do have grey hair, frequently
wear braids and those are my favorite reading glasses!
Some people have
suggested that the logo should be more modern. I deal with modern technology.
But I like the friendliness of the little old lady. She’s not as scary as
“modern technology.” I think the logo says that if she can handle it, so
can you!
The final proof for me
is that I have never handed a business card to someone without them smiling at
the lady. That’s a positive start to a relationship!


May 7, 2013
Set Print area in Microsoft Excel 2010
Excel can be a little tricky in getting exactly what you
want to print. In Excel we usually need certain records and/or columns to
print, and it isn’t always separated on different pages. Here is a way to have exactly what you need
print. First, highlight the cells you
would like to print, and then click on the Page Layout Tab. In the middle of the Page Setup group you
will click Print Area. Lastly, in the
small drop down list click Set Print Area.
Now when you go to print your document the only thing that will print
will be the cells that you highlighted. If you ever need to print your whole
document or change the area you need printed, just follow these same steps but
click Clear Print Area instead.
May 6, 2013
"Pipe Dream" - Animusic.com
From the Animusic 1 DVD -
This is the runaway hit from the first Animusic DVD - find more at
www.animusic.com!
May 2, 2013
Convert an Excel Spreadsheet to text in Word 2010
We get information in all kinds of different types of documents;
well here is any easy way to take the table formatting off of your Excel
information when interesting . First, copy the information from your Excel
Spreadsheet and paste it into your Word document. Doing this will make two more
Tabs available in Word. Then, click on the Layout Tab that is now available, and
in the Data group, click Convert to Text.
This will remove the table from your information so that you can
reformat it any way you would like.
May 1, 2013
Project 2013 Essential Training with: Bonnie Biafore
Follow along with author Bonnie Biafore as she shows you how to
better manage your project's deadlines, tasks, and resources with Microsoft
Project 2013. This course covers setting up project files, creating tasks,
assigning resources, working with views, and using baseline calculations to
track progress. Plus, learn how to report project information and share it with
others.
Subscribe to:
Comments (Atom)

